 | |||||
| Welcome to NoEmotion HDRs | |||
| Please use the links in the main menu to start downloading your HDRs. If you want to know more about this webpage and its creators, and about the process of creating HDRs, continue reading. | |||
| When we started using HDRs and image based lighting back in 2007-2008 the quality of most HDR images was poor and there was a very limited selection to choose from. Back then, a chrome sphere was the standard method for HDR capture and the limitations of this method meant that they were not suitable for sharp, detailed reflections. The Preetham 'physical sky' models that many render engines had implemented were similarly unimpressive and did not produce the results I was after. On top of all that, almost nobody was using gamma correctly (and many still don't!). Despite this, I was committed to getting the best out of my image-based lighting renders and so I set out to teach myself. | |||
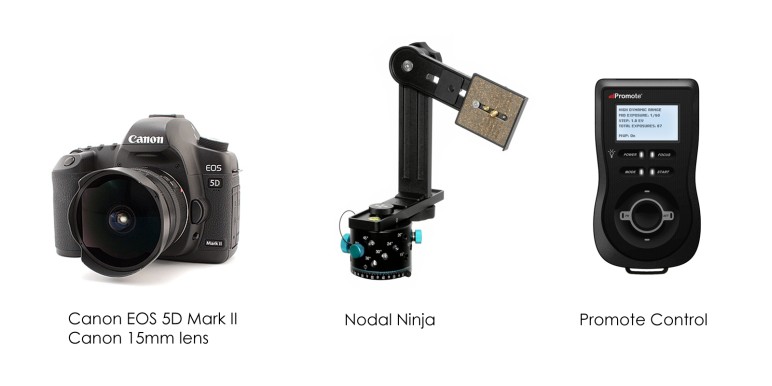
| Camera/Sensor choice was pretty clear from the get-go: Canon's EOS 5D Mark II . It was the best camera camera on the market at that time, and remained so for a long time after. The lens choice was a bit more complicated. I experimented with several, but in the end the 15MM was a clear winner. With the 15mm, I was able to take a set of 6 images (with a 72 degree offset) to cover the entire 360-degree horizontal range, and still have enough overlap for high-quality stitching. Later, I added a 'zenith' and 'nadir' shot to fill in the tripod location and fill a gap at the top of the panorama. In summary, that's 8 pictures in total to cover a full 360x180 degree HDR. But that was not enough for me. I didn't want to see a tripod visible in my nadir and so I added another capture with the tripod moved away from the original position and the center arm of the Nodal Ninja flipped. It takes a bit of practice to get a hang of this technique, but it works! | |||
 |
|||
| Very effective combination | |||
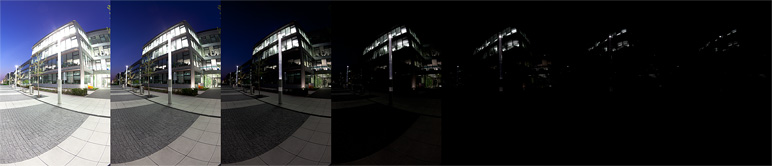
| My bracketing is always based on the given lighting conditions, but normally I start with the fastest possible shutter on the MK II (1/8000s). From there, I step up by 2EV until I get all the details out of the shadows. For daylight scenes, 6 brackets are usually enough to capture everything. For night shots, you need to add one or two long exposures at the bottom end to extract detail from the super-dark shadow areas and the night sky. At the other end of the exposure spectrum you have overcast, cloudy days. For those, the dynamic range is more limited and you can get away with 4 exposures. A Promote control or similar is an absolute must for programming your brackets. it allows you to shoot fast and not touch the camera's physical shutter. When shooting HDR's, speed is critical. You won't believe how fast those pesky clouds move! If it takes you more than 30 seconds to shoot your moody 360-degree sunset, you're toast :) In the end, all exposures accounted for at all offsets, my count is around 50-80 images. | |||
 |
|||
| Multiple exposures taken for each angle | |||
| I saved the images as Canons CR2 raws files and processed them with DxO Optics for removal of noise, fringing/aberration and other unwanted lens artifacts. From there, I save the output as TIFF files and stitch using PTGUI. Call me old school, but this software has it all. It doesn't have a fancy interface, but it's incredibly fast and precise. The masking tools are also a great help with getting rid of unwanted elements (tripod, tripod shadow, photographer shadow, cars, people etc.). All of my exposures are aligned, so I only need to stitch one exposure and then use the same template for the rest. Each exposure gets stitched to a separate panorama and exported as a 15x17.5k TIFF file.. | |||
 |
|||
| Each exposure level stitched to separate 360x180 degree panorama | |||
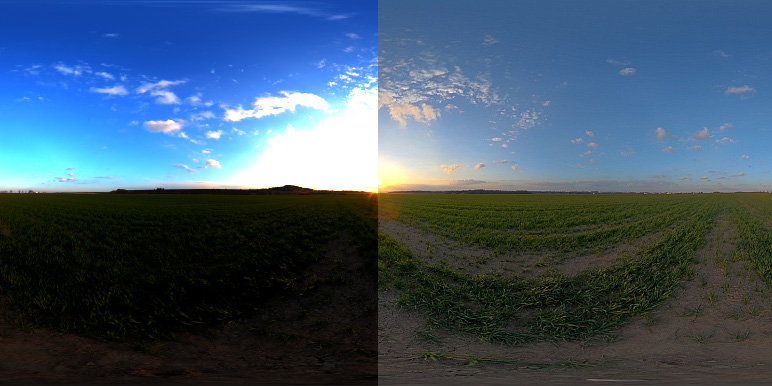
| The next step is exposure merging and for that I use Photomatix. It is a very simple process of loading all of the stitched panoramas for a bracketed set and 'merging' them into a single linear HDR image. | |||
| At this point the only thing left is finishing touches. I align the images so that the sun is in the center of the panorama. I paint out unwanted elements, fix up little stitching issues, and adjust the base exposure level at which the file is saved. The HDR image is linear, so to create an LDR preview, I use tonemapping. Photoshop's tonemapper is just fine for this purpose and I adjust and tune the settings for each image by eye. It's very useful to have these quick thumbnails ready for when you are lighting your CG. You just go and pick the one you think will work, without having to wait for the 350mb full-resolution file to load. | |||
 |
|||
| Same picture showing linear HDR image(left) versus ldr tonemaped image(right) | |||
| Frequently asked questions: | |||
| 1.Can I use your images for commercial work? | |||
| You can use the HDRs for both personal and commercial work, it`s free to download and licenced under creattive Commons : | |||
 NoEmotionHDRs by Peter Sanitra is licensed under a Creative Commons Attribution-NoDerivatives 4.0 International License. Based on a work at http://noemotionhdrs.net. Permissions beyond the scope of this license may be available at http://noemotionhdrs.net | |||
NoDerivatives — If you remix, transform, or build upon the material, you may not distribute the modified material. Attribution — You must give appropriate credit, provide a link to the license, and indicate if changes were made. You may do so in any reasonable manner, but not in any way that suggests the licensor endorses you or your use. The license may not give you all of the permissions necessary for your intended use. For example, other rights such as publicity, privacy, or moral rights may limit how you use the material. |
|||
| 2.Where were the photos taken? | |||
| Most of the pictures were taken around Prague and Czech Republic. A few mountain shots are from Swiss Alps. Most of the day or sunset hdrs were take here or here | |||
| 3.How much time did you spent creating all those HDRs? | |||
| For these 150 HDR on this web, it has been roughly 350 hours. Before that, I spent quite some time doing reasearch on effective worklow, hardware, software, scouting for locations etc. They were taken over a period of roughtly 10 months. You can find the day and month in each HDR`s filename. | |||
| 4.Why do the thumbnails look different than the HDR files? | |||
| Linear HDR data is not suitable for viewing directly. It usually covers a range larger then our monitors can display. The JPGs are created with tonemapping, which is a method of compressing the dynamic range of HDR data into a narrower 8bit per color range. | |||
| 5.Dowload is slow or not working! | |||
| They are probably too many people downloading too many HDRs at once. We understand that you want it all, but there is a bandwith limit of roughly 1TB per day. One HDR is 300MB, please don`t download everything at once, if you do, nobody else will be able to, please also use mirror links and, most importantly, be patient :) | |||
| 6.Why am i not getting sharp shadows from sun on your HDR?! | |||
| You need extremely high floating point values in the sun area to get sharp shadows. It`s a bit more complicated to capture, but more importantly, it just does not make sense to do it from a rendering point of view. In almost every practical situation, you want to define your directional light source's position precisely, based on shot, camera angle, character pose etc, You don`t want it to be fixed, without precise control. Also it will be slower for any render engine to clean/sample the areas where you have float values like 0.3 and 53.5 next to each other. Situations like that can create unwanted artifacts commonly known as 'fireflies'. | |||
| 7.What render engine is the best for HDRs? | |||
| The one that works for you! We use Chaosgroup's V-Ray | |||
| Thank you and happy downloading. | |||
| Peter of NoEmotion | |||